

Ever heard the expression, “first impressions matter”? We might have different opinions about the saying. But, one thing’s for sure: first impressions matter if you’re selling on Carousell.
Did you know that your product photos are the first thing that catches the buyer’s attention when they browse the marketplace? They resort to a pattern of endless scrolling and scrolling until that thumb-stopping moment when they find something that catches their eye.
It’s kind of like Instagram when you scroll through the thousands of pictures and stop to see a beautifully-taken photograph. Similarly, the power to attract a crowd to view your listing on Carousell is in your hands, well, literally because you have to take your product photos.
We understand that product photography isn’t natural and not everyone’s an expert at it. But, that changes today because we’ll go through five (5) handy smartphone photography tips so your listings will turn into shop-worthy products on Carousell.
Product Photography Tips to Become a Power Carouseller
Taking a picture of the item you’re selling is the first step on how to sell on Carousell.
Here’s a brief look at the product photography tips we’ll cover in this guide. Feel free to jump to the topic that interests you the most.
Mega hint: Read all so you can be the “pro” in product photography. Get it?
- How to make your product the center of attraction
- How to keep your product in focus
- How to apply the Parallel & Perpendicular Rule
- How to achieve proper lighting for your photo
- Take photos from different angles
Once you learn these 5 product photography tips, you’ll be taking brilliant shop-worthy photos. The best thing? You don’t need a fancy DSLR; your smartphone camera is enough. Easy.
Let’s start with the first product photography tip, making your item the star attraction.
Product photography tip 1: Make your item the center of attraction.
Quick question: ever looked up someone’s profile on social media and found it hard to tell how he or she looks like because every photo is a group shot?
We have, and it can be annoying. It’s the same when you’re browsing on the Carousell marketplace.
Buyers don’t have the time to spare to try and figure out what you’re selling. They’ll probably skip yours, and there goes your sale. So, make it obvious to them. Make your item the center of attraction.
But, how do you do it? Here are 2 quick pointers for you:
- Use a contrasting background to make your item stand out
- Don’t distract buyers with unnecessary things in your photo, display what you sell in your cover photo
Try comparing these 2 photos below:
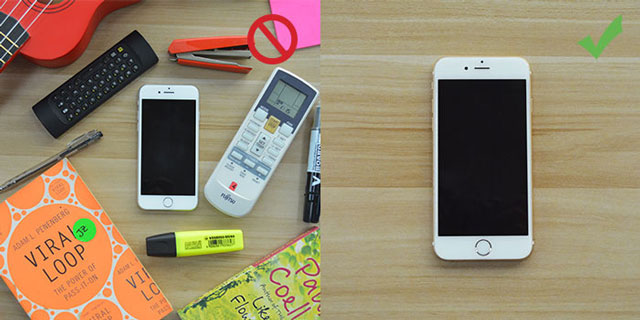
See how the picture on the right shows a much clearer picture of what I might be selling?
Be clear so you don’t have to entertain too many questions from interested buyers.
product photography tip #1: Place your item in the center to give it the attention it deserves.
Let’s move on to the second tip on product photography!
Product photography tip 2: Keep your product in focus.
Just to be clear, your phone camera has to be the one in focus (they say communication is key).
Photos that are out-of-focus are the worst, especially when you’re shopping online.
Everyone wants to be sure where they’re putting their money, and we’re sure you do too. Besides, how are buyers even going to tell what your product is if the picture isn’t clear?
Give your item the attention it deserves by focusing your camera on it before you snap a photo.
How? Just tap your finger on your product and watch how your phone camera focuses. After that, take your picture.
Now, at least every buyer on Carousell can precisely tell what you’re selling.
Here’s an example comparing a photo out-of-focus and a photo that’s adequately focused:
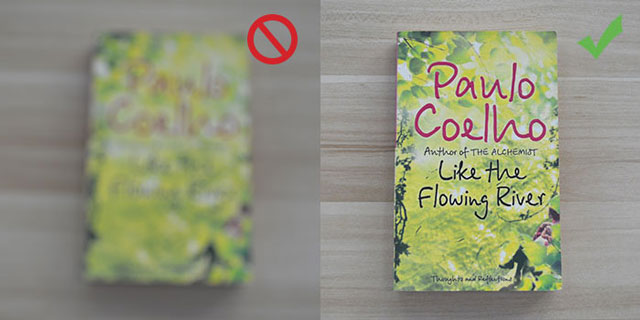
See what we mean when we said photos that are out out-of-focus are the worst?
Product photography tip #2: Focus on your product before you snap a photo for better clarity.
For the next tip on product photography, we’ll cover a rule in picture-taking called the “Parallel & Perpendicular Rule”.
Product photography tip 3: Parallel & Perpendicular Rule
We know this rule sounds complicated, like something out of your school’s math book but don’t worry, we’ll explain how it works.
If you place your item parallel to the wall for a photo, you should position your phone perpendicular to the floor (90-degree angle).
What if you placed your items on the floor instead? You should do an overhead shot by pointing your phone straight down (parallel to the ground).
By following the Parallel & Perpendicular rule, you’ll avoid distorted pictures with weird camera angles.
Using the rule keeps the method simple, and we all love simple.
Product photography tip #3: Avoid distorted photos by following the Parallel & Perpendicular rule.
That’s it for the third tip, now on to the fourth one!
Product photography tip 4: Take photos in good lighting.
Lighting is one of the most critical elements of great product photography.
If you practice and experiment with good lighting, your photos will turn out spectacular.
You might think that you need fancy equipment like a lightbox or studio lighting, but that’s not necessary.
Your smartphone and some help from the good ol’ Sun is enough.
Also, some people confuse a perfectly lit picture with bright and overexposed photos, but that’s wrong.
Here’s how you can avoid making the same mistake by taking note of these two pointers:
- Set up close to your window: For objects small enough to fit in your house, have your window 90 degrees to the left/right to your product.
- Avoid direct or harsh sunlight: Don’t place your object directly in front of your window or take photos during the noon or you’ll get poorly lit pictures.
If you’re a busy bee and the only free time you have is during the night, make sure the room you’re in has proper lighting so you can snap great photos of your item.
Product photography tip #4: Proper lighting is key in taking amazing photographs.
Let’s go through the final tip to enhance your product photography game!
Product photography tip 5: Take multiple photos to showcase your item.
Have you heard of the expression, “a picture paints a thousand words”? Here’s what we think: why stop at a thousand words when you can paint 4 thousand instead?
Carousell allows you to upload up to four photos of your product, and that’s huge because having more images will only increase your chances of selling your item.
After taking your cover picture, here’s what you can use the three other photos for:
- Take a picture of your product in its natural setting (e.g. if it’s a shoe, show how it looks like on your feet with jeans on)
- Show buyers how they can use your product (e.g. take a picture of your juicer with fruits in it so buyers immediately know how they can use it)
- Showcase your item at different angles (e.g. snap the front and back of a t-shirt to show how it looks)
Your 3 supporting photos can mean the difference between a buyer’s decision to forget about your item or their interest in buying it.
Product photography tip #5: Display your product by showcasing it in different ways and angles.
Great product photography takes practice.
Alright, now you’re seriously ready to improve your product photography game on Carousell. Try out these tips we shared, and you’ll have a bunch of shop-worthy photos in your profile. So, whip out your phone, get on the Carousell app and start snapping pictures to sell.
You might land in a situation where you’re unhappy with how your photo looks, and that’s fine. It happens to us, too. All you got to do is to edit your product photos.
It’s like how our resident photographer loves to say, “editing the photo is as important as taking the photo”.
Luckily for you, Carousell has an in-app editor, so you don’t have to switch apps to do a quick edit. We’re going to show you exactly how you can edit your photos on Carousell in three (3) steps as a bonus for sticking this far!
Bonus product photography tip: Edit your photos using Carousell’s in-app editor.
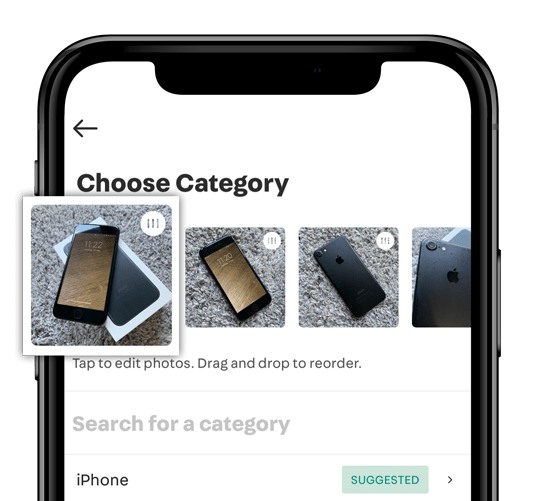
Step 1: Select the photos you want to upload and tap on the picture you wish to edit. You will see a screen called “Reposition and Crop”.
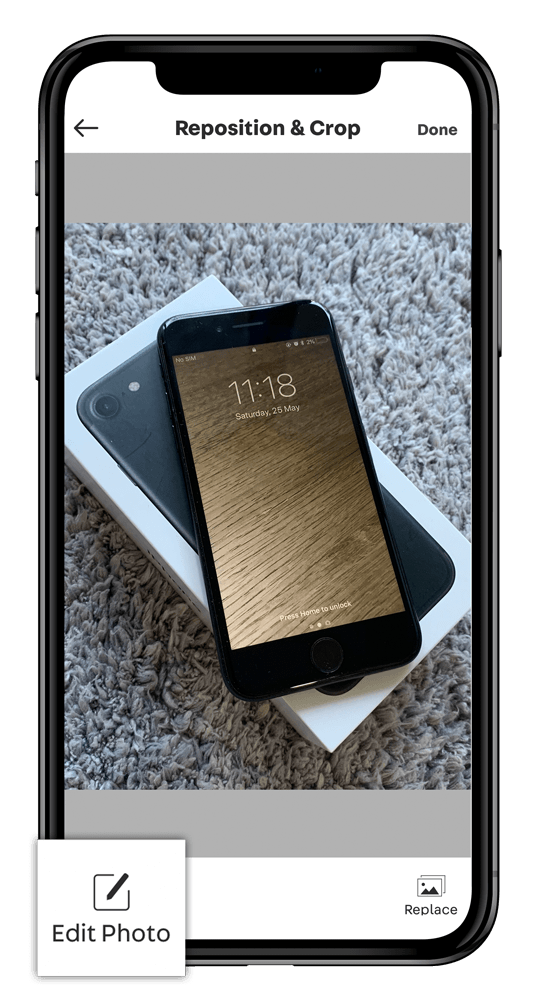
Step 2: Tap on ‘Edit Photo’ at the bottom left corner of your screen.
Step 3: Select the tool you want to use to edit your photo in the bar below your screen.
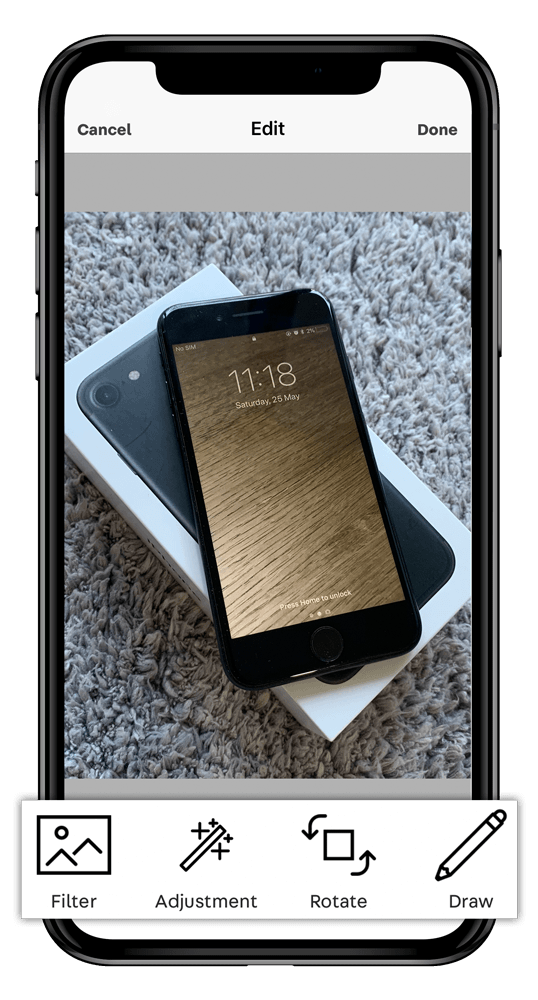
Feel free to toy around with variety of editing tools to achieve the look you want.
Here’s the full list of what you can change with our in-app editor:
- Filter
- Brightness
- Exposure
- Saturation
- Rotation
- Cropping
We reckon that’s way more than enough to turn your listings into shop-worthy ones with beautiful pictures.
Show off your product photography skills with your listings on Carousell
Whew, that’s a long guide, but thank you for sticking around till the end! We hope these product photography tips we shared will help kickstart your journey to becoming a power Carouseller.
Remember, people love buying things that make them feel and look great.The only way people can picture that scenario is with your beautifully taken product photographs.
So, start snapping shop-worthy photos because that’s one of the ways to sell faster on Carousell.
Let us know if you have any questions and feel free to share this guide with your friends who need help with product photography too!
Happy Carouselling!


